You are using an out of date browser. It may not display this or other websites correctly.
You should upgrade or use an alternative browser.
You should upgrade or use an alternative browser.
PAL 50/60Hz switch
- Thread starter Waren Al'Kar
- Start date

Hi Miabocca,
Thanks very much for the post. 😉
Sorry to be away so long.
I managed to get the 32 pin Saturn open this evening.
I stripped the machine and got to the pcb board,There i found the jumpers in the diagram that a freind sent me.
I cut the track as in the picture and found it did nothing to the pic?
I then desolded the resistor between jp2 and connected jp1 instead.
This made the pic go really distorted.
I then reconected jp2 with solder and desoldered jp1 and the machine was back to normal.
I had done the cut in the track as in the pic but had no posative results with the picture.
On the plus side though it showed that for these surafce mount resistors(between the jumpers) can simply be desoldered from the pcb,Which will come in handy for when doing the country mod on the 32 pin machines.
I will get back to my freind and checkout exactly what he has done with his 32 pin machine for full screen etc.I am very intreaged at the 32 pin machine and will deffinatly have a good go at cracking it.
The 64 pins are real easy for region and 60hz,But less compatable when it comes to chipping.They are possible but a little more tricky.
I guesss its kind of like a double edged sword with the 32 pin machine so far:
Great to chip but a little hard to get full screen and multi region.
Will keep at it though,
Thankyou,
Ian. 😀
Another dumb question from me,,,
Now, this region mod. Is it possible to run 2 regions at once? I want to play uk and jap games from the same machine. This may same slike a silly question but it seems like a tricky mod. I have no idea what sought of switch to use, ,,
I do have a cd+plus which is used for playing imports, Since my only saturn titles that have a cart are jap, can i use the cd+ cart in a jap modded machine to play PAL? or are these carts region specific as well.
Thanks for your help ppl
Hey all! I'm a completely new poster here, but I thought I might be able to add something...
I bought my first Saturn about a week ago, and last weekend I turned to modding it (installing a 50/60 Hz switch and a three region switch), planning on mainly using the method described at http://www.mameworld.net/pc2jamma/satmod3.html (it involves building a small circuit with an hex inverter to control the jumpers) It soon turned out that my motherboard was of the type that has two of the three jumpers needed for region modding on one side, and another one on the other side of the board (croft was kind enough to post a 50/60 Hz modding guide earlier in this topic using the same board model). Now, being a complete newbie when it comes to soldering and the like, this kind of freaked me out. GameSX.com's modding guide didnt help much either, since my Saturn was just about the only version where they didn't have any good pictures of the jumpers.
Anyway, using a multimeter I soon figured it out (one of the jumpers, the "lone" one, is actually reversed!), and I made sure to document more or less the whole process using my digital camera, taking some real closeups along the way. I also took some closeups of the 50/60 Hz mod. I was going to offer these images to GameSX, but I was just wondering if anybode here is interested. I learned a lot doing this mod, so I think I should be able to answer a few questions as well, if anyone has any.
Oh, and how did the modding go? Excellently! My Saturn works like a dream now, and I also think the installation turned out rather nice for someone who has never ever done anything like this before. 😉
So, anyone interested in these images? I don't have any space to host them on ATM, unfortunately...
Originally posted by mal@Feb 2, 2004 @ 05:26 PM
The region mod can involve changing the Saturn to just one region (by rearrainging the jumpers) or to all (by installing switches).
As for which switch to use, if you're not sure about that, maybe you shouldn't be considering doing the mod yourself.
Ahh ,, ok
I have modded a model 2 before and am excellent with the soldering iron. I dont think I wouldnt consider doing it myself. Do you know what switch to use???
Machines successfully modded by me,
Saturn
PSX
Psone
MD
SMS1
SMS2
Famicom, (AV out)
NES, region
SNES, region & 50/60
PS2, modchip
According to http://www.mameworld.net/pc2jamma/satmod3.html you can easily just remove the surface mount resistors using a soldering iron.
As for the switch... if you only want to switch between two regions, then I recon you could use a on-on double switch, with six pins in total. Only the "settings" for jumpers JP10/11 and JP12/13 differ between the European version and the Japanese version. Break the existing connections there (fiddly! And make sure not to break any other connections. I used the top of a modelling scalpel). The six pins on the switch should be arranged like a six on a dice, three rows with two pins on each. Connect one of the rows to one of the outer jumper surfaces (not to any of the two in the middle of each jumper pair) on both jumper pairs, the middle row to one of the centre "common points" (the two metal surfaces in the middle of a jumper pair) of both jumper pairs, and finally connect the last row to the other outer jumper surfaces on both jumpers. I'm enclosing a diagram of it. It migh be quite fiddly, but you should be able to pull it off. I just wrote this up off the top of my head, but this should work, shouldn't it?
I went for a three region switch. It requires a bit of electronics though, but the instructions can be found at the link I posted.
Damn, I can't seem to be able to attach the file
Good luck!
Originally posted by mal@Feb 2, 2004 @ 08:58 PM
I don't understand.
You say you've done region switches before but that you don't know what kind of switches to use.
Heheheh
No, i didnt do a switch before. I permanently modded the saturn to jap with just solder alone. Check the mods i've done, they are all simple ((except ps2) and include just an on or off. the sat region switch will need 6 wires on each side , so im guessing a switch is needed with 12 contact points, ie 6 on each side.
I dont know why this is bothering me but what is the name of such a switch??? DOH! This is how I picture it ::: ::: with the switch either going exreme left or right.
Woops, I screwed up. You need to be able to switch all three jumper pairs for a Europe - Japan mod. Oh well, use the guide I linked to and you should be fine, Dev0.
In other words, the image I so painstakingly made is absolete XD . It was a .gif image btw.
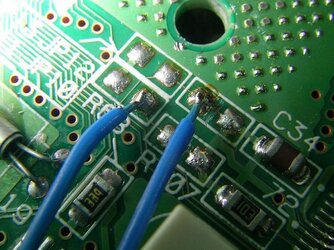
Here's an image of wires soldered to JP 10/11 and JP12/13. Note the cut tracks (one of the two cuts is slightly behind the right wire).
In other words, the image I so painstakingly made is absolete XD . It was a .gif image btw.
Here's an image of wires soldered to JP 10/11 and JP12/13. Note the cut tracks (one of the two cuts is slightly behind the right wire).
Attachments


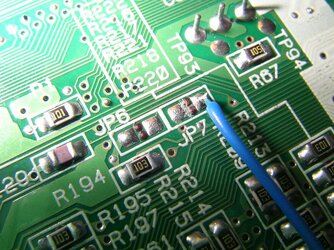
And here's one with a wire soldered to JP7. The tricky thing with this version of the Saturn is that the common pair isn't the two in the middle, but the first and third ones from the right, so if you were to solder a wire to the second one from the right it wouldn't work. I think it's an early (European) 64-pin model 2.
Also note that there's a risk of scraping off the little wire connecting the common pair when scraping off the wire between ground and the common pair.
Also note that there's a risk of scraping off the little wire connecting the common pair when scraping off the wire between ground and the common pair.
Attachments


Similar threads
- Replies
- 6
- Views
- 2K
- Replies
- 2
- Views
- 3K
- Replies
- 6
- Views
- 6K
- Replies
- 20
- Views
- 19K