PAL 50/60Hz switch

Croft, an awesome mod guide you posted here.. I just did the 60Hz mod on my PAL Saturn with the pencil method. I failed the first time, didn't use a knife to scrape away the "shiny surface" on the motherboard, but succeded the second time.

There is however a few downside you fail to mention or don't know about. For PAL optimized games like Virtua Fighter 2, Sega Rally, Duke Nukem 3D, Quake etc, running them on 60Hz will result in the images being clipped(missing) on the bottom side of the screen, and possibly game moving too fast. So it's better to run PAL optimized game on 50Hz. And for 2 PAL games that I know isn't opitmize, Street Fighter Alpha 2 & King of Fighters '95, running them on 60Hz will make the intro scene out of sync with the music and probably the entire game is out of sync with the music.

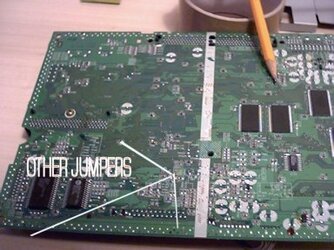
I'm planning to switch it back to 50Hz and then install a switch to change it between 50 or 60Hz freely. Will it work if I solder wires on JP1&2 and connecting/disconnecting the wires to switch between 50 & 60Hz?

BTW For those of you who do not know, there's now a TV with a zoom function(for wide screen DVD movie). You can use this function to remove the black boarder on the top and bottom of screen when playing non optimized PAL games. I've a 21" Samsung Plano and I uses the zoom function all the time when playing non optimized PAL game.
 
Hi REDFIELD :thumbs-up: .

Thanks for the post,

Wow,Cool-You tried the Mod for the Saturn. :smokin: .

Thanks for the info about the pal games running in 60hz,This is very usefull.

Indeed some of the pal games do look wierd in 60hz.

One thing i did forget to metion was:

WITH THE MOTHERBOARD IN THE PICS THERE IS ANOTHER SET OF JUMPERS THAT HAS TO BE HACKED FOR THE TERRITORY OF GAMES.

I think they are JP6/7.

I found them out last night after modding another machine and finding that it wouldnt play Jap games?

I then found out i had forgotten about the jumpers on the underneath.

SORRY ALL.

Sega moved them around to give us guys a hard time finding them :rant .

I think the switch Redfield is a good idea for the pal 50/60 mode.

The tv you use sounds very usefull.

I did have a Philips widescreen tv that was kind of on its way out,So i turned it completely on its side for games like Latersection 2 and Ikaruga.

It looked awsome but my brother nearly fainted when he saw a 28 inch widescreen tv on its side in the living room :drool:

Also i have noticed that some of the Saturn consoles do have small surface mount resistors on the jumper switches.

I am not shure how to mod these yet but will experiment and post asap.

Thanks Redfield. ;)
 
Wow thanks a lot Croft, I really appreciate you taking so much trouble to help out :thumbs-up: .

I'm gonna buy a new PAL saturn soon so I'll let you know how it worked out.
 
Hi Sane :)

Thanks,Thats much apreshiated.

Its great to put some info on the net on modding Sega Saturns.

I hope you get the Pal Saturn soon.

I found that all the 32 pin chip vershions i have do not give as good picture as the later 64 pin vershions?.

Its like the playstation 1,I can remember that the later models gave far better picture quality,I guess its advancements in manufacturing etc.

The next hack i am going to try is to see what effect taking the psu board out and housing it in its own box has on picture quality.

I usually mod hi fi and now that the worst evil in any components are the transformers which give off stray magnetic fields.

Also upgrading the audio capacitors to some good audiophile quality ones is another idea.

Build quality wise i think the Saturn was far more ro bust than many consoles of its day,The laser mechanism is real sturdy.

Hope all goes well with the machine,

Cheers,

Ian :cool:
 
Hi All

A newbie here but a mad collector of anything video game related. Have all the sega units and play constantly.

I'm wanting to mod my pal saturn to run at 60hz, Im not sure how as it is an old one. I believe it may have been a store demo machine or some such thing as it was taken from a collection of 20 saturns all vel-croed together. Anyhoo, the mobo is a 1995 model with a seperate board for the card slot (vcd card). Ive read this awesome thread and found J1 and J2 which are nowwhere near the image's jumpers. It didnt work at all :(. Any ideas on modding one of these machines? is it just a regular 1st model?

Any help appreciated.

Cheers
 
HI Devo ;)

Thanks for the post.

I think there may have been an error in the description of the jumpers for the full screen 60hz mod.

The Jumper in question is JUMPER 1 i beleive.

On 64 pin saturns this is not conected(joined)

It is in exactly the same position as the one in the pic which is on the reverse of the pcb.

I think i may have got my info confused with the megadrive mod which is exactly the same as the Saturn mod,the only differnce being the track has to be cut on the megadrive.

I also have 4 odf the 32 pin machines.

My freind also just bought a Saturn with 32 and tryed to mod it for full screen.

Having done the mod it did not work for him.

I called around his house last night to have a look at the unit and it does appear that these vershions have small surface mount resistors covering the Jumpers themselves.

I am not shure how to mod these editions of the Sega Saturn.

Maybe it may be a case of removing the surface mount resistor and modding as the 64 pin vershions.

I do have some good links on the net and will hunt this info out.

I have also been dismantling the Saturn and have managed to mod the cd spindle.

It is not perfect but what it does do is let you open the lid while the machine is on and make the laser spin whenever you want to.

I tried taking the very small green clip off from the main board which connects to the upper pcb at the bottom left og the 64 pin model.

I noticed the machine did not spin up when i did this and also the boot screen graphics were behaving oddly.

I then questioned what this connector lead actualy does(in the hope it controls the power to the cd motor mechanism).

It turned out that it carries the signal from the clip that makes contact when the lid is closed.

This(top left) clip needs to be modded so it is ALWAYS IN CONTACT.

Then on the clip wires at the bottom left (as in pic) just snip any one of these.

The pic shows them all cut but you DO NOT HAVE TO DO THIS,Just one is needed.

Then fit a switch between your cut cables,This can be put anywhere on the front of the machine.

My intention was stalling the laser unit.

This is close but not as intended.

Stalling the laser unit will be the next mod which will involve modding the laser mechanisms solder track on the upper pcb.

Will let you know how i get on.

Sorry if my info is not constructed very well,the main aim of the last mod is to HAVE THE LID OPEN AND PAUSE THE LASER WHILST THE MACHINE IS ON.

Cheers,

I ;) an.
 

Attachments

  • aa.jpg
    aa.jpg
    29.2 KB · Views: 135
  • aa.jpg
    aa.jpg
    29.2 KB · Views: 136
Thanks for the help with this, Im thinking on buying a new version saturn later this year.

BTW, the jumper layout for the region selection is totally different as well. I know this as i have modded a saturn with a 3 way switch for jap/us/uk.

I'll keep reading this forum for the wealth of information!

Cheers
 
Hi All,

Here are the other jumpers which i did not mention in the upper pics.

There are 2 of them which alter the region territory.

Aswell as the ones on the front of the pcb(upper pics).

Thanks,

Ian. :thumbs-up:
 

Attachments

  • AAAD.jpg
    AAAD.jpg
    34 KB · Views: 146
  • AAAD.jpg
    AAAD.jpg
    34 KB · Views: 125
Ah well

My saturn is packed because i am moving next week. Im gonna mess around with the jumpers ans see what happens. I am a bit scared as this saturn is in perfect condition.

Thanx
 
Hi all

And thank you to croft for your email last week. :bow

My Saturn arrived today, tested it out with Virtua Fighter 2, and everything is in working order.

So now onto modding it!! :devil

I hope you guys can help me out a little here, since I've never done anything like this before.

I've been following your instructions in this thread croft, but I'm afraid I've come stuck quite early on.

Here's the Saturn with the top off:

1.jpg


I got the point of taking out the part that connects to the power supply (which is only the second thing to do I know (told you I got stuck early on!)

I have taken out 3 screws (cicled green below), but the orange/brown board seems to be stuck - is there another screw I am missing, or is it plugged into the bottom (I marked the part I think is connected to the board below with a red square on the picture below.

2.jpg


I didn't want to tug too hard in case I did something I would regret! But do I just need to give it a little tug to unplug it, or is there another screw I haven't seen that is holding it in place?

Thanks for your help :)
 
I'm pretty sure it's just those three screws.

The connector that you've marked in the red rectangle can be quite stiff. Just try to lift the whole PSU board up as evenly as you can, slowly but firmly.
 
Right-i-oh.

I'm down to the main board now (sorry about the blurry pic, it's the best one I could get).

I found JP1 & JP2.

3.jpg


The crud diagram is a close-up - Both JP1 & JP2 have two little silver parts to them - what exactly do I have to do?

Do I need to scribble the pencil over all 4 parts, joining them all, or do I need to connect both in JP1 to each other, and both in JP2 to each other, or do I need to join the top to bottom the ones on JP2 to the ones below them on JP1?

(Sorry to sound dense, but I haven't done anything like this before).

Do I actually use the pencil on the silver metal parts, or just inbetween them?

Thank you.
 
Great info in the pics Miobocca.

Great news that you got the Sega saturn console.

You are on the wright track and are doing great.

With the Saturn that you have it is one of the "32 pin" vershions.

This relates to the BIOS CHIP and its legs on the laser board.

Good news is that with this model it is very easy to chip so it can play backups (cdr) if you wish.

This model is the first generation Saturn and the there are a few modifications which make it different.

Mainly the pcb layout differs from the second model.
 
The position of the Jumpers will be different from the info posted before.

I have 3 of these type of machines.

With the second generation vershion i have done over ten of these.

With this model i have not yet modded them but a freind who lives in the same town has managed to mod this model.

I am going to get all of the info from him asap and post on the site.

I also have links galore which i will post to you.

The jumpers you have found do control region compatability(jap,usa,uk) and also full screen presentation.

The jumpers on the model Saturn that you have do have small surface mount resistors on them.

They still have to be modded and this info will be on the site as soon as i have it.

With the second jen sats the jumpers JP1 control full screen.

With the pencil technique this will work on any pcb and can easily be used.

Most of the mods for 1st or 2nd gen sats will either require cutting the tracks between some of the jumpers and also joining them(solder or pencil).

Will be back soon with more info.

P.S. your animation in the post is brilliant,Almost bust a rib laughing :hehehe:
 
Brilliant, I am very grateful for your help croft! :)

Ooo, the animation in my avatar is from Elvira: Mistress of the Dark - great film :D
 
To play CDR you can either buy a Chip or use whats known as the "BOOT SWAP TECHNIQUE".

The chips are quite rare and there are some compatability issues(mainly to do with how many pins you have on the laser ribbon cable).

They do work though and can be really useful.

The boot swap method is on the whole pretty good.

i have noted though that with first gen machines (the one you have) the laser does seem to load a lot faster,so timing is everything.

It only takes about 30 seconds.

A few mods can be made to the machine and also sometimes you only need press reset.

The main aim is to fool the sat in thinking its found an original holographic seal of authentisity(the outer ring on the disk of every original).

Will be back asap. ;)
 
Back
Top